
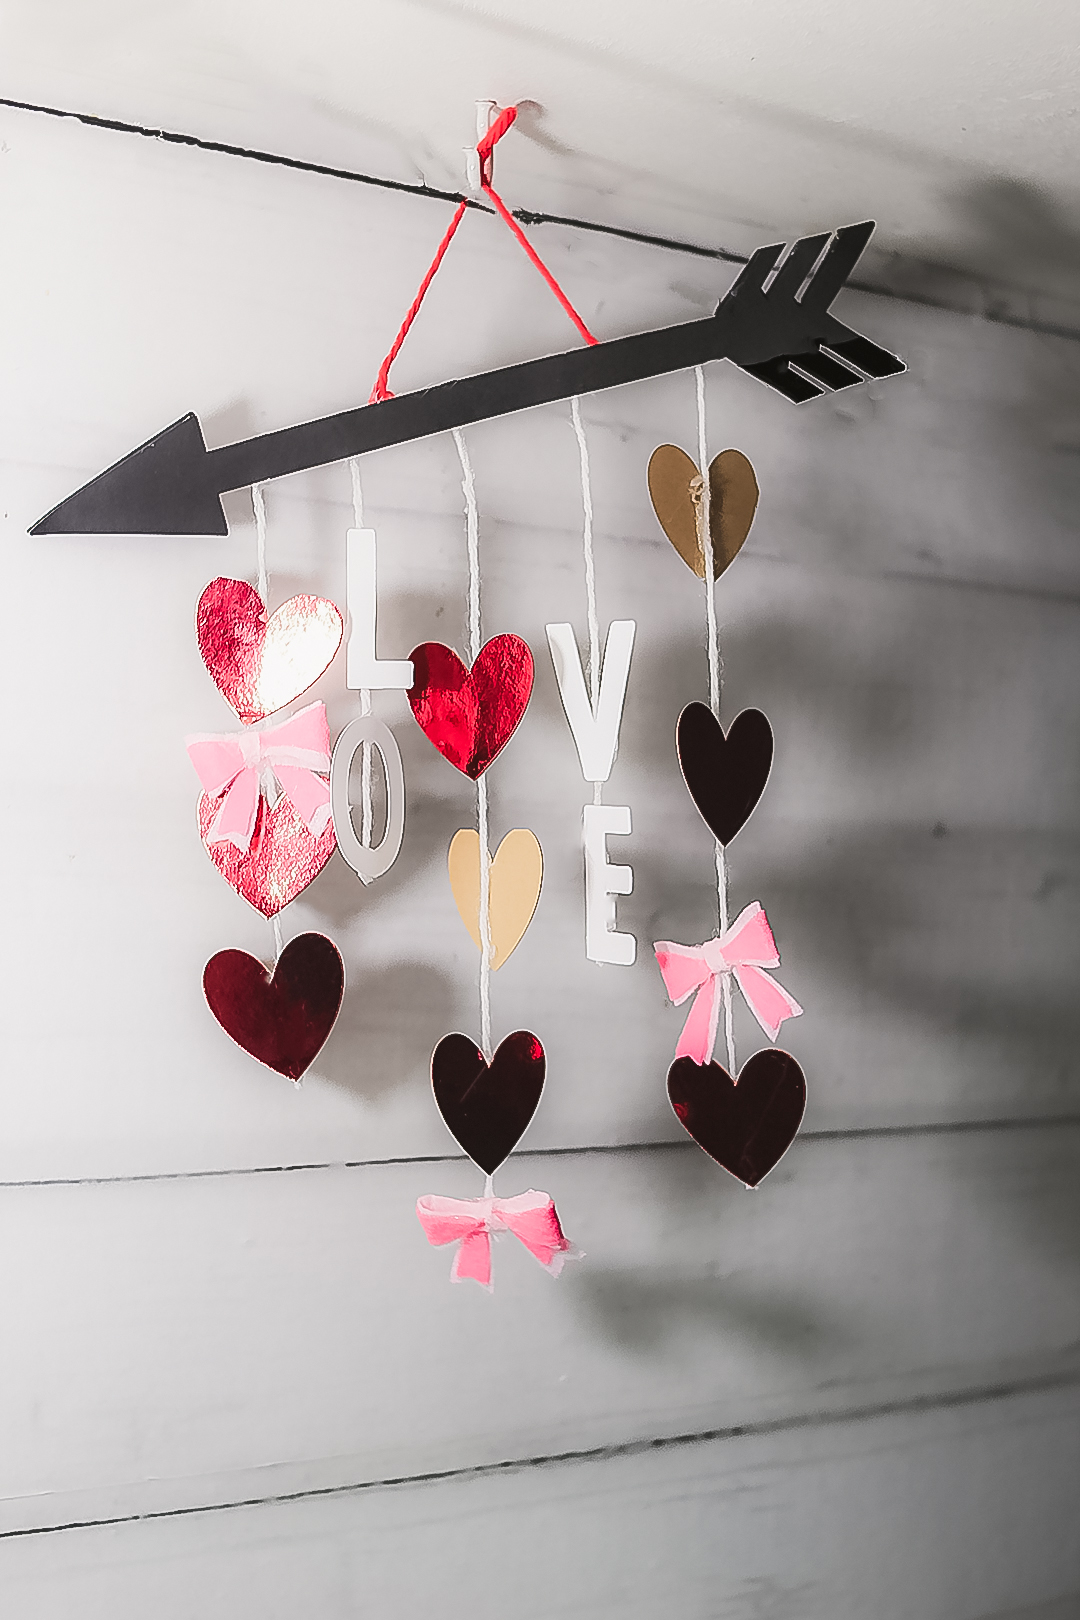
DIY Valentine’s Day Hanging Wall Decor

Most of the people I know are done with decorating for a while but not me. I don’t really need an excuse to deck my halls with whatever tickles my fancy, but holidays are a given. I may have taken my Christmas decorations down but I’m already working on making fun Valentine’s Day crafts. The first one I’m sharing is this adorable DIY Valentines Day Wall Hanging wall decor.

The pictures don’t do it justice because the combination of dreary weather and artificial lighting doesn’t play nice with the Cricut Foil Kraft Board. It’s gorgeous in person, take my word for it (or make it yourself and see!)
This was also the first time I used my Cricut Maker to cut felt. F-U-N!

I loved the first project so much I made another one, using a different method. There was going to be a video of the process but apparently, I don’t know how to record a video. I spent a good 20 minutes talking to myself after the camera stopped recording 5 minutes in! Sorry guys, but I promise to deliver DIY videos soon!
Contents
2 Versions, 1 Valentines Day Wall Hanging


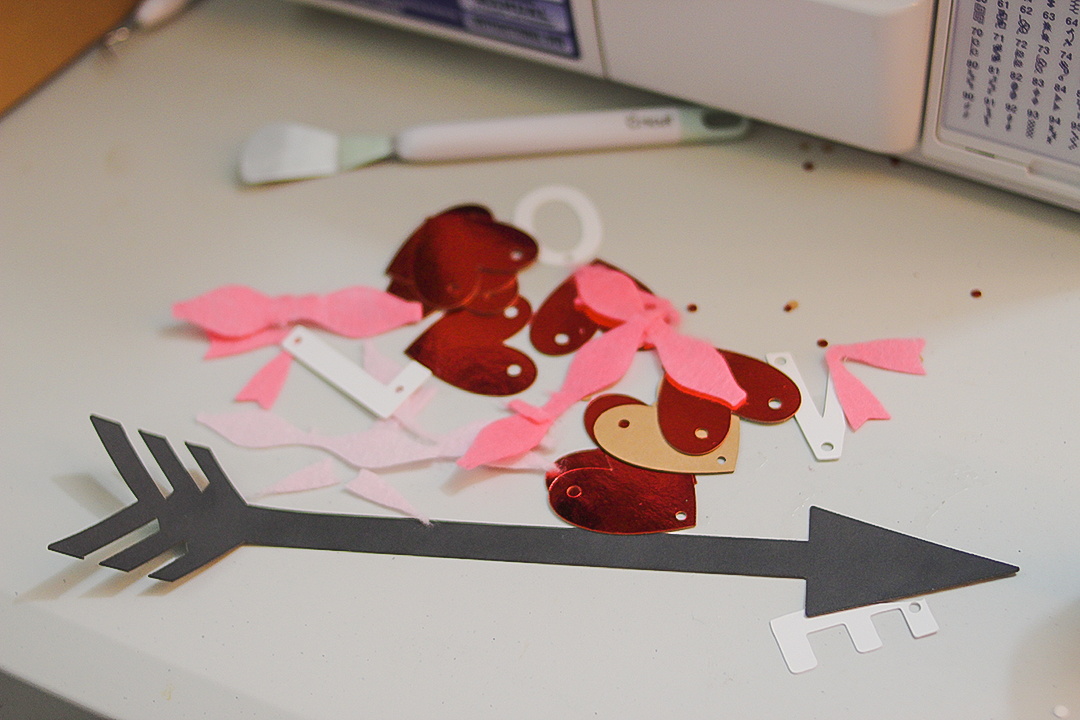
Both versions of this DIY Valentines Day wall hanging have their upsides. There are some downsides too. Project #1 uses a lacing stringing method (get that project here) to connect the hearts and letters. About halfway through I found a really easy method of doing this but it’s hard to explain in words.
I took a 2-inch piece of yarn and laced it on the front of the heart so the yarn came out of the back. I knotted it at the end. Then I pressed the knot through the hole at the bottom of the next heart and pulled just so so it was secure. I did the same for the next one in the line. It was a lot easier than the method of knotting, cutting, tieing, repeat I was doing before. Get Project #2 here.
Making Felt Bows with the Cricut Maker
I have yet to master the art of tying the perfect bow with ribbon so I really love making bows with the Maker. It really couldn’t be easier and there’s literally 0 chance to mess it up (trust me, if there was a way I would have found it!). I made one set of bows using the Fine-Point Blade and the other using the Rotary Blade. The Rotary Blade was the clear winner when it came to complete and clean lines so I suggest using that blade to cut felt.
Using the Rotary Blade for DIY Valentine’s Day Crafts
When you go through the steps to make the bows, Design Space doesn’t automatically give you the option or suggest using the rotary blade. You need to tell the Maker to use the Rotary Blade yourself. Don’t worry, it’s not a hard process, use the image below to guide you.

When you’re done cutting the felt be sure to switch the blade back to Fine-Point and change the cutting material. I can’t tell you how many times I’ve forgotten to do that and ended up wasting material!
And I tried using tacky glue to make the bows but it didn’t hold the felt very well so I highly suggest using hot glue. It helps to have the glue gun preheated so that when your bow pieces are cut you can get right to making the bows.

Making Felt Bows
Starting with the long pieces, glue the shorter of the two on top of the longer and flip over (skip this step if you don’t want a bi-color bow). Put a dot of hot glue in the center of one piece and fold each end in so they meet in the middle. Hold them in place with a toothpick or something similar (anything but your fingers… hot glue burns!!)

Next, wrap the smallest cut out pieces, the center pieces, around the middle of each bow and secure on the back with hot glue. Glue the smaller, individual tail sections onto the larger tails and secure to the back of the bows with hot glue. Voila, you have bows.

Once the bows are out of the way you can assemble the mobile in no time. Meanwhile, string the hearts, either by lacing them or gluing them, and then the letters, ending with 5 strings in total.
After that, use glue to attach the strings to one of the arrows then glue the other arrow over the strings. Trim any overhanging yarn and the ends of the strings and clean up any stray glue strings and bits.
Finally, take a 3 – 4-inch piece of string and glue it to the back of the arrows to make a hanger.
You can hang the mobile from the ceiling and it will spin and dance, or you can hang it on the wall so it stays put. In conclusion, this is a wonderful and easy DIY Valentine’s Day piece to bring some fun color into your home.

DIY Valentine's Day Hanging Wall Decor
Materials
- 2 sheets of felt (white and pink)
- 3 sheets of Kraft Paper (red, black, and white)
- Light grip mat (the blue one)
- Fabric mat (the pink one)
Tools
- Cricut Maker
- Hot glue gun with glue sticks
- Rotary blade
- Fine-Point bade
Instructions
- Open the Design Space design (laced design here) (glued design here) of your choice. Load the felt on the pink mat and the kraft board on the blue mat. Follow the directions to cut the pieces, changing tools and materials as necessary.
- Make the bows according to the directions above.
- Cut 5 separate strings of yarn, varying in length, but at least 5 inches each.

- Flip the hearts over and make a line of hot glue down the center. Immediately press the yarn into the glue, leaving at least a half-inch of yarn at the top. Do the same for the letters (L and O on one string, V and E on another).
- Glue the strings to one of the arrows then glue the other arrow on top of them. Trim the overhanging yarn and the ends of the strings.
- Glue a 4-inch piece of yarn to the back of the arrows to make a hanger.
Recommended Products
As an Amazon Associate and member of other affiliate programs, I earn from qualifying purchases.


That is so clever, I would love a machine like this
I need to create a DIY for Valentine’s Day! This one is so nice! Making DIY Valentine’s craft is so much fun.
This is really cute. Though we don’t really decorate the house for valentine’s day, I just shared this idea with my husband who’s a teacher since they put up decorations in school in time for V-Day. Thank you for sharing this.
Super cute! We don’t usually decorate for Valentines but my daughter’s office is big on decorating for any occasion. I will share this with her. Maybe their team will win a prize!
Such a cute DIY Valentine’s craft to make for decor! I’ve been thinking about getting a cricut machine just haven’t taken the plunge yet.
I love DIY projects and this one looks like it is easy and fun.
This is such a cute DIY project which I know my almost teen daughter would love to have hanging in her room, it is also so easy to do this.
I love it, it’s so beautiful and looks so easy to make.
I would love to make this. I have a Galentines event this would be fun for it.
I love this DIY valentine project, so cool and most importantly is personalized and DIY. How cool can that be?
This is so cute! I can make this with my daughter because I have all of the supplies here at home already.
What a cute little DIY. I don’t currently have a cricut but my friend does so maybe we can try this out.
This is a stunning craft! The foil paper is perfect for the hearts.
This is really cute an affordable to make. May have to send this to my daughter
That is a lovely DIY and quite simple one too! I really loved those cute tiny bows that you have made there
Those Valentine’s Day decorations are cool! I don’t own a cricut machine, maybe someday I will get one.
This is so cute. I really want to get a cricut so I can make things like this.
Loves the Valentine’s Day project. I don’t have a cricut but I will ask a friend to cut the parts and then I will put them together with my kids.
Nnniiiccceeeee….this is some creativity! It’s not the usual decoration for the day that you get to see. I am used to seeing flowers and cards in Uganda. You did good. I love it.
This is such a cute decor idea for Valentines. I love how easy it is to make.
This is lovely. I definitely must make this.
What beautiful little things to make by yourself 🙂
Such a cute Valentines project! I might try this even though I don’t have a cricut.
Valentines is around..
Excited for this
This is very cute. It looks like you could do something like it even if you couldn’t afford to buy a Cricut.
I love this! I need a Cricut!
I am a huge fan of your DIY projects, they are so much fun to do and very creative. Thanks a lot.
This is just so cute!
Valentines is just a month to go.
Love this idea of yours