
Introducing the EasyPress 2 from Cricut
This is a sponsored conversation written by me on behalf of Cricut. The opinions and text are all mine.

I spent the better part of a week learning everything I possibly could about the EasyPress 2 from Cricut. I didn’t have experience with Iron-On applications so I figured I’d play it safe. Thankfully, when it comes to Cricut, things are very well explained and there are always resources to answer any questions that come up. Since I’ve wanted to make t-shirts and throw pillows for basically ever, I was excited and eager about learning to use the EasyPress 2. It’s more cost-effective for me to buy plain t-shirts and put my own designs on them than pay $30+ for mass-manufactured ones.
There’s also the added bonus of putting my creative spin on the designs I use. Before I show off my first Iron-On project, I want to introduce you to EasyPress 2.
Contents
Say hello to my dream come true — EasyPress 2 from Cricut!
The Cricut EasyPress 2 is designed to give professional iron-on results in 60 seconds or less. Unlike using a household iron to fuse iron-on transfers, EasyPress 2 provides even heat distribution.

Imagine peeling up the film of your transfer to find only half of it fused. If it gets to that point there’s a good chance you won’t get the perfect alignment and the resulting transfer will be slightly off or worse.EasyPress 2 is similar in functionality to commercial heat presses but scaled down to fit virtually anywhere. That’s even truer since the machine is available in 3 different sizes. You can buy the Cricut EasyPress 2 in sizes 6″ x 7″, 9″x 9″ and 12″ x 10″. Choose the size that fits your needs and available space or stock up on all three.
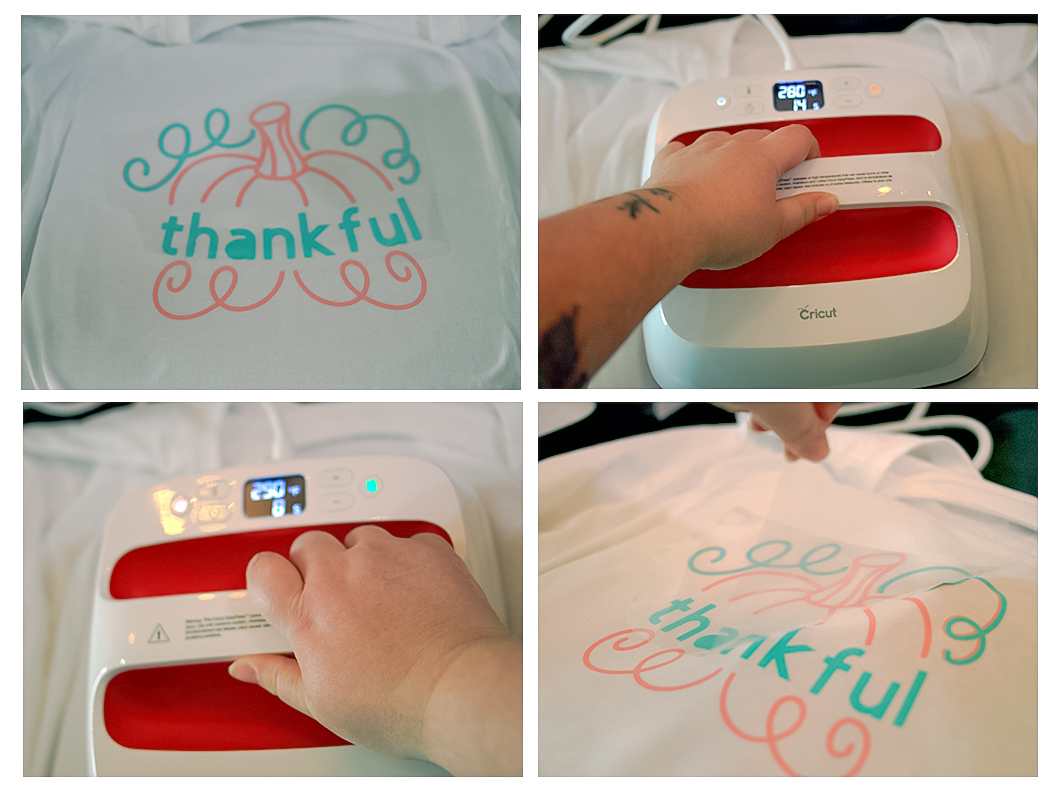
Like the Cricut cutters, EasyPress 2 comes packaged with everything you need to learn by doing, i.e. creating your first heat transfer vinyl project. In this instance, applying the Cricut ‘C’ to the canvas tote bag that the EasyPress 2 was tucked away in.

The included directions walk you through the simple steps which let you get a feel for how the machine works. From turning it on, adjusting the temperature, and setting the timer. The Cricut Heat Guide is your resource for determining what temperature you should set the EasyPress 2 at. Just
- select your machine
- choose the transfer material and the base material from the dropdown
- decide what you’re using to protect the surface from heat
This page is also a great way to see what base materials you can transfer to. I had no idea you could transfer iron-on vinyl to wood, but you can! There are some materials that only work on certain bases, so the Heat Guide can help you figure out if your project is possible before you get ahead of yourself.
Using Heat Transfer Vinyl for the First Time — My UH-OH Moment

I’m not sure how it happened, but somewhere in my studying, I skipped or completely forgot the part about weeding heat transfer vinyl. Get ready to laugh at me, because I made a huge faux pas during my first attempt at using the machine. Seriously, common sense was not around when this happened. Okay, here’s what happened.I got the design to a point where I was happy with it (click here to get it) and used the Cricut Maker to cut it. I did remember to mirror the images and even to put the iron-on vinyl shiny side down on the cutting mat.
This is where it gets bad.
I pulled the design off of the mat, trimmed around the edges, flipped it over and laid it on the t-shirt shiny side up.
The EasyPress 2 was already at the right temperature and I had already preheated /de-wrinkled the shirt so I just lifted it from the base, pressed it onto the vinyl and set the timer. At no point did I hesitate. I lifted the EasyPress 2, returned it to its base, and grabbed my weeding tool.
Are you with me?

I tried to weed the design after it was fused to the shirt. That wasn’t my finest moment, but I didn’t let it bring me down. I’m chalking it up to my brain doing a hard reset and a momentary loss of intelligence.

Once I shook it off I redid the cutting and fusing and the result was perfect. I even changed things up a little to where I loved the design. I’m definitely happier with how the second attempt came out and the colors I used on the second pass are even better too! So, messing up wasn’t that bad after all.

You can find directions for my first iron-on project below, but first, grab the design on DesignSpace.
If you’ve ever dreamt of making t-shirts, bags, or home decor, the EasyPress 2 is the perfect way to do it. It’s incredibly easy to use and the results are phenomenal. I couldn’t be happier (or more addicted) than I am. I can’t wait for the next project, and the next one, and the next one!
Until then, enjoy.

Thankful T-Shirt
A cute Thanksgiving inspired t-shirt with 3D like embellishment.
Materials
- 2 colors of Iron-On Vinyl
- 1 T-Shirt
- EasyPress Mat or towel
Tools
- Cricut Maker (or similar machine)
- Weeding tool
- EasyPress 2
Instructions
- Open design in Cricut Design Space. Preheat the EasyPress 2 to 330 °F.
- Resize (if necessary) the image and cut with Mirror ON. Be sure to load the mat with the shiny side DOWN (stuck to the mat)
- Unload the mat. Carefully remove the vinyl from the mat and weed until the only thing left on the clear backing is what's being transferred to the t-shirt.
- Place the Cricut EasyPress mat or towel on the surface you'll be working on. Lay the shirt on the mat.
- Lay the design on the shirt, shiny side UP. Position it where you'd like it to be fused.
- Position the EasyPress 2 on top of the design and gently press down. Set the timer for 30 seconds and press the Cricut logo to start.
- Flip the shirt over and press for 15 seconds. Flip back over and wait for 20 - 30 seconds or until the backing is warm to the touch.
- Gently peel up a corner of the backing to make sure the vinyl fused. Continue lifting until the backing is completely off.


Oh wow, this looks so handy! I’d love to have one of these for myself.
This looks so cool. There are so many things I can make with this and it’s nice and compact.
I saw this being used on QVC or HSN… not sure which but Cricut ha the coolest gadgets for crafters 🙂 Will have to check this out.
That sounds like a wonderful device for DIY creators! I love that tee you designed. It looks super cute!
That is a cool device for crafters! I think my kids could use it! My family love craft and art!
Sounds like a cool and useful device. I love the design too.
What a great device! It can be stressful having to iron on vinyl and making sure I don’t inadvertently pull it up early.
I had no idea you could make shirts using cricut. This is such a game-changer! Sharing with a friend who is running her own t-shirt company.
I would love to share this with my mother-in-law. She loves creating and being crafting with Cricut products.
This looks like a great product. I don’t even have the Cricut yet. I’ve been wanting one for so long though. I hope to be able to get one some day.
My niece is always using her Circut. I do not know much about them I just reap the benefits. BUT you have made it look so easy that now I am interested!
Love this product! My nice would adore this, may have to get her one for Christmas!
Wow that makes putting the designs on shirts super easy. I love the design you have on that shirt! One day I will have to get a Cricut machine and try it out!
This looks like fun. My kids and my students would absolutely love this!
That’s very cool. What a cute design you made too! These are useful gadgets.
I have an EasyPress 2, and it is a valuable crafting tool! I like that it heats uniformly across the heating plate and that it is easy to grip.
I would love to have a cricut machine. But at the moment, I don’t have much use for one unless I could figure out a way to earn some money doing it. Maybe Ill find some giveaways for one. 🙂
These machines can do so much! I’m not a crafter but this makes a perfect gift for someone who is
This is so cool. I have always been interested in making shirts and stuff like this.
This is super cool, i want to do this too. What you did is cuteee.
I need this. I love creating shirts and this looks like it actually works great!
How cool! I love how this turned out. I hear such great things about the cricut machine.
I have to add this to my holiday wish list. This looks like such an awesome product to have. I love the way this tutorial turned out.
The EasyPress 2 sounds so simple and fun to use. I could see a lot of matching shirts for me and my girls!
This is super cute. I am in love with those colors for Fall, I would have never thought to put them together but now they are my favorite combo. Also, thanks for sharing your mess-ups because honestly, I didn’t think I could have ever recreated something like this but now I feel like it’s worth trying because that result is worth a few shots to my ego. If at first, you don’t succeed, try again and you will have an awesome shirt. haha I love it!